Tutorial: Advanced usage of DeepProg model
Visualisation
Once a DeepProg model is fitted, it might be interessant to obtain different visualisations of the samples for the training or the test sets, based on new survival features inferred by the autoencoders.For that purpose, we developped two methods to project the samples into a 2D space that can be called once a SimDeepBoosting or a simDeep is fitted.
# boosting class instance fitted using the ensemble tutorial
boosting.plot_supervised_predicted_labels_for_test_sets()
The first method transforms the OMIC matrix activities into the new survival feature space inferred by the autoencoders and projects the samples into a 2D space using PCA analysis. The figure creates a kernel density for each cluster and project the labels of the test set.
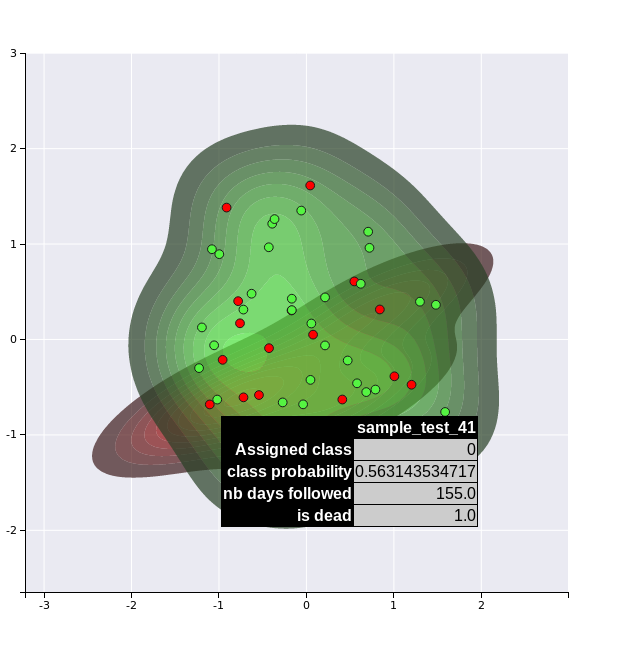 kdplot 1
A second more sophisticated method uses the new features inferred by the autoencoders to compute new features by constructing a supervised network targetting the inferred subtype labels. The new set of features are then projected into a 2D space using PCA analysis. This second method might present more efficient visualisations of the different clusters since it is uses a supervised algorithm.
boosting.plot_supervised_kernel_for_test_sets()
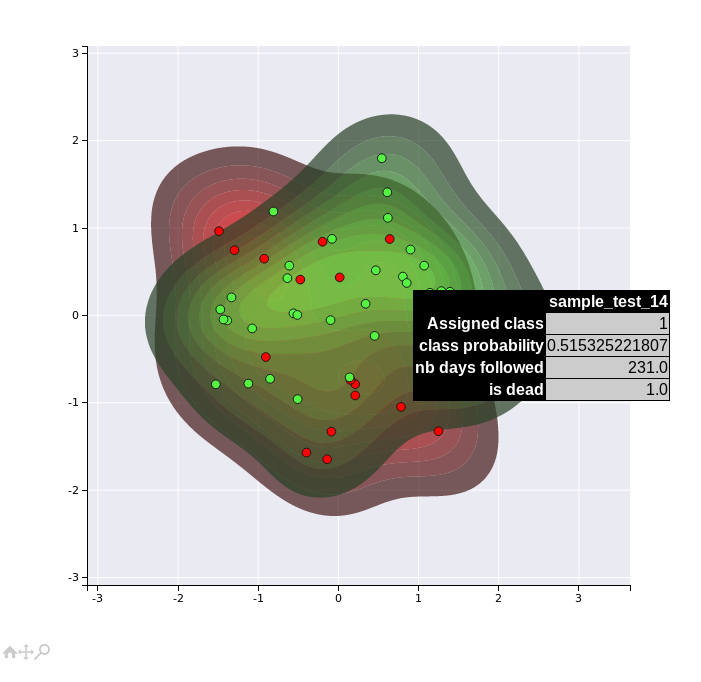 kdplot 2
Note that these visualisation are not very efficient in that example dataset, since we have only a limited number of samples (40) and features. However, they might become more useful for real datasets.
Hyperparameters
Hyperparameters can have a considerable influence on the accuracy of DeepProgs models. We set up the default hyperparameters to be used on a maximum of different datasets. However, specific datasets might require additional optimizations. Below, we are listing
Normalisation
DeepProg uses by default a four-step normalisation for both training and test datasets:
Selection of the top 100 features according to the variances
Rank normalisation per sample
Sample-sample Correlation similarity transformation
Rank normalisation
default_normalisation =  {
    'NB_FEATURES_TO_KEEP': 100,
    'TRAIN_RANK_NORM': True,
    'TRAIN_CORR_REDUCTION': True,
    'TRAIN_CORR_RANK_NORM': True,
}

boosting = SimDeepBoosting(
        normalization=default_normalisation
    )
However, it is possible to use other normalisation using external python classes that have fit and fit_transform methods.
from sklearn.preprocessing import RobustScaler

custom_norm =  {
    'CUSTOM': RobustScaler,
}

boosting = SimDeepBoosting(
        normalization=custom_norm
    )

    ```

Finally, more alternative normalisations are proposed in the config file.

### Number of clusters

The parameters `nb_clusters` is used to define the number of partitions to produce

```python
#Example
boosting = SimDeepBoosting(
    nb_clusters=3)
boosting.fit()
Clustering algorithm
By default, DeepProg is using a gaussian mixture model from the scikit-learn library to perform clustering. The hyperparameter of the model are customisable using the mixture_params parameter:
# Default params from the config file:

MIXTURE_PARAMS = {
    'covariance_type': 'diag',
    'max_iter': 1000,
    'n_init': 100
    }

boosting = SimDeepBoosting(
    mixture_params=MIXTURE_PARAMS,
    nb_clusters=3,
    cluster_method='mixture' # Default
    )
In addition to the gaussian mixture model, three alternative clustering approaches are available: a) kmeans, which refers to the scikit-learn KMeans class, b) coxPH which fits a L1 penalized multi-dimensional Cox-PH model and then dichotomize the samples into K groups using the predicted suvival times, and c) coxPHMixture which fit a Mixture model on the predicted survival time from the L1 penalized Cox-PH model. The L1 penalised Cox-PH model is fitted using scikit-survival CoxnetSurvivalAnalysisclass for python3 so it cannot be computed when using python 2. Finally, external clustering class instances can be used as long as they have a fit_predict method returning an array of labels, and accepting a nb_clusters parameter.
# External clustering class having fit_predict method
from sklearn.cluster.hierarchical import AgglomerativeClustering

boostingH = SimDeepBoosting(
        nb_clusters=3,
        cluster_method=AgglomerativeClustering # Default
    )


class DummyClustering:
    self __init__(self, nb_clusters):
        """ """
        self.nb_clusters

    def fit_predict(M):
        """ """
        import numpy as np
        return np.random.randint(0, self.nb_clusters, M.shape[0])


boostingDummy = SimDeepBoosting(
        nb_clusters=3,
        cluster_method=DummyClustering # Default
    )
Choice of specific OMIC for clustering
Not all the OMIC type needs to be used for clustering (Although they are by default). The option clustering_omics controls which omics are used for clustering if not all. However, all the input OMICS will be used to classify new samples using the intersecting features across all the omics.
boosting = SimDeepBoosting(
    ...
    clustering_omics=['RNA', 'MIR'], # Only 'RNA' and 'MIR' will be used for clustering the samples
    ...
    )
Embedding and survival features selection
after each omic matrix is normalised, DeepProg transforms each feature matrix using by default an autoencoder network as embedding algorithm and then select the transformed features linked to survival using univariate Cox-PH models. Alternatively, DeepProg can accept any external embedding algorithm having a fit and transform method, following the scikit-learn nomenclature. For instance, PCA and fastICA classes of the scikit-learn package can be used as replacement for the autoencoder.
# Example using PCA as alternative embedding.


from scklearn.decomposition import PCA


boosting = SimDeepBoosting(
        nb_clusters=3,
        alternative_embedding=PCA,
    )
Another example is the use of the MAUI multi-omic method instead of the autoencoder
class MauiFitting():

    def __init__(self, **kwargs):
        """
        """
        self._kwargs = kwargs
        self.model = Maui(**kwargs)


    def fit(self, matrix):
        """ """
        self.model.fit({'cat': pd.DataFrame(matrix).T})

    def transform(self, matrix):
        """ """
        res = self.model.transform({'cat': pd.DataFrame(matrix).T})

        return np.asarray(res)

    boosting = SimDeepBoosting(
        nb_clusters=3,
        alternative_embedding=MauiFitting,
        ...
    )
After the embedding step, DeepProg is computing by default the individual feature contribution toward survival using univariate Cox-PH model (feature_selection_usage='individual'). Alternatively, DeepProg can select features linked to survival using a l1-penalized multivariate Cox-PH model (feature_selection_usage={'individual', 'lasso'}). Finally if the option feature_surv_analysis is parsed as False, DeepProg will skip the survival feature selection step.
# Example using l1-penalized Cox-PH for selecting new survival features.


from scklearn.decomposition import PCA


boosting = SimDeepBoosting(
        nb_clusters=3,
        feature_selection_usage='individual'lasso',
        # feature_surv_analysis=False # Not using feature selection step
        ...
    )
Number of models and random splitting seed
A DeepProg model is constructed using an ensemble of submodels following the Bagging methodology. Each sub-model is created from a random split of the input dataset. Three parameters control the creation of the random splits:
-nb_it <int>which defines the number of sub-models to createand
-split_n_foldwhich controls how the dataset will be splitted for each submodel. If-split_n_fold=2, the input dataset will be splitted in 2 using theKFoldclass instance from sciki-learn and the training /test set size ratio will be 0.5. If-split_n_fold=3the training /test set size ratio will be 3 / 2 and so on.The -seedparameter ensures to obtain the same random splitting forsplit_n_foldandnb_itconstant for different DeepProg instances. Different seed values can produce different performances since it creates different training datasets and is especially true when using lownb_it(below 50). Unfortunalley, using largenb_itsuch as 100 can be very computationally intensive, especially when tuning the models with other hyperparameters. However, tuning the model with smallnb_itis also OK to achieve good to optimal performances (see next section).
Usage of metadata associated with patients
DeepProg can accept an additional metadata file characterizing the individual sample (patient). These metdata can optionally be used as covariates when constructing the DeepProg models or inferring the features associated with each inferred subtypes. The metadata file should be a samples x features table with the first line as header with variable name and the first column the sample IDs. Also, the metadata file can be used to filter a subset of samples.
# See the example metadata table from the file: examples/data/metadata_dummy.tsv:

head examples/data/metadata_dummy.tsv

barcode sex     stage
sample_test_0   M       I
sample_test_1   M       I
sample_test_2   M       I
sample_test_3   M       I
sample_test_4   M       I
sample_test_5   M       I
Each of the column features containing only numeric values will be scaled using the sklearn RobustScaler method. Each of the column having string values will be one-hot encoded using all the possible values of the given feature and stacked together.
The metadata file and the metadata usage should be configured at the instantiation of a new DeepProg instance.
    # metadata file
    OPTIONAL_METADATA = 'examples/data/metadata_dummy.tsv'
    # dictionary used to filter samples based on their metadata values
    # Multiple fields can be used
    SUBSET_TRAINING_WITH_META = {'stage': ['I', 'II', 'III']}

    boosting = SimDeepBoosting(
        survival_tsv=SURVIVAL_TSV,
        training_tsv=TRAINING_TSV,
        metadata_tsv=OPTIONAL_METADATA,
        metadata_usage='all',
        subset_training_with_meta=SUBSET_TRAINING_WITH_META,
        ...
        )
metadata_usage can have different values:
NoneorFalse: the metadata will not be used for constructing DeepProg models or computing significant features'"labels"': The metadata matrix will only be used as covariates when inferring the survival models from the infered clustering labels."new-features": The metadata matrix will only be used as covariates when computing the survival models to infer new features linked to survival"test-labels": The metadata matrix will only be used as covariates when inferring the survival models from the labels obtained for the test datasets"all",True: use the metadata matrix for all the usages described above.
Computing cluster-specific feature signatures
Once a DeepProg model is fitted, two functions can be used to infer the features signature of each subtype:
compute_feature_scores_per_cluster: Perform a mann-Withney test between the expression of each feature within and without the subtypecompute_survival_feature_scores_per_cluster: This function computes the Log-rank p-value after fitting an individual Cox-PH model for each of the significant features inferred bycompute_feature_scores_per_cluster.
R installation (Alternative to Python lifelines)
In his first implementation, DeepProg used the R survival toolkits to fit the survival functions (cox-PH models) and compute the concordance indexes. These functions have been replaced with the python toolkits lifelines and scikit-survival for more convenience and avoid any compatibility issue. However, differences exists regarding the computation of the c-indexes using either python or R libraries. To use the original R functions, it is necessary to install the following R libraries.
R
the R “survival” package installed.
rpy2 3.4.4 (for python2 rpy2 can be install with: pip install rpy2==2.8.6, for python3 pip3 install rpy2==2.8.6).
install.packages("survival")
install.packages("glmnet")
if (!requireNamespace("BiocManager", quietly = TRUE))
    install.packages("BiocManager")
BiocManager::install("survcomp")
Then, when instantiating a SimDeep or a SimDeepBoosting object, the option use_r_packages needs to be set to True.
    boosting = SimDeepBoosting(
    ...
        use_r_packages=True,
    ...
)
Save / load models
Save /load the entire model
Despite dealing with very voluminous data files, Two mechanisms exist to save and load dataset.
First the models can be entirely saved and loaded using dill (pickle like) libraries.
from simdeep.simdeep_utils import save_model
from simdeep.simdeep_utils import load_model

# Save previous boosting model
save_model(boosting, "./test_saved_model")

# Delete previous model
del boosting

# Load model
boosting = load_model("TestProject", "./test_saved_model")
boosting.predict_labels_on_full_dataset()
See an example of saving/loading model in the example file: load_and_save_models.py
Save / load models from precomputed sample labels
However, this mechanism presents a huge drawback since the models saved can be very large (all the hyperparameters/matrices… etc… are saved). Also, the equivalent dependencies and DL libraries need to be installed in both the machine computing the models and the machine used to load them which can lead to various errors.
A second solution is to save only the labels inferred for each submodel instance. These label files can then be loaded into a new DeepProg instance that will be used as reference for building the classifier.
# Fitting a model
boosting.fit()
# Saving individual labels
boosting.save_test_models_classes(
    path_results=PATH_PRECOMPUTED_LABELS # Where to save the labels
    )

boostingNew = SimDeepBoosting(
        survival_tsv=SURVIVAL_TSV, # Same reference training set for `boosting` model
        training_tsv=TRAINING_TSV, # Same reference training set for `boosting` model
        path_data=PATH_DATA,
        project_name=PROJECT_NAME,
        path_results=PATH_DATA,
        distribute=False, # Option to use ray cluster scheduler (True or False)
    )

boostingNew.fit_on_pretrained_label_file(
    labels_files_folder=PATH_PRECOMPUTED_LABELS,
    file_name_regex="*.tsv")

boostingNew.predict_labels_on_full_dataset()